
Pixy Newspaper 11 Blogger Template: Complete Setup Guide
Customize Pixy Newspaper 11 Blogger Template with clear steps for featured posts, menus, widgets, post settings. Includes examples and troubleshooting.
Before you start
Three small steps will make the setup smoother.
- 01Download and keep your template file nearby.
- 02Back up your current Blogger theme first.
- 03Keep your Blogger dashboard open while you follow this guide.
YOUR PIXY NEWSPAPER 11 SETUP PLAN
Build the essentials first, then refine each section
This Pixy Newspaper 11 guide walks through the controls included in your theme: featured posts. Keep Blogger open in another tab and check each change on the public blog as you go.
- 1. Keep a working copy
Back up the theme and save important gadget content. - 2. Set your identity
Replace the logo, navigation, and demonstration links. - 3. Configure the layout
Use the sections and shortcode formats documented for this template. - 4. Finish the reading experience
Review article details, comments, ads, and sidebar content. - 5. Test the complete route
Check mobile menus, links, forms, and the last page of results.
You do not need to change every option in Pixy Newspaper 11 Blogger Template at once. Start with the parts readers see first, then work through the layout one gadget at a time. This documentation keeps the theme’s own field names and shortcode formats visible, explains what each setting controls, and adds checks that help you catch a misplaced value before it affects the rest of the site.
Before you start: save a backup and prepare your content
- Choose the correct blog in Blogger. Open Theme, expand the menu beside Customize, and download a theme backup. Save your important HTML/JavaScript and Link List gadget contents separately.
- If you are installing the template, extract its download package and choose the Blogger theme XML file in the Theme restore/upload control. Keep the existing custom code before you replace a theme.
- Prepare your logo, page links, social profile URLs, and any images needed for homepage panels. Publish a few representative posts with featured images and consistent labels.
- Open the public blog in a second tab. Save one gadget, refresh that tab, and check the result before making another change. This makes it much easier to identify the setting responsible if something looks wrong.
A theme backup protects the design. A content backup protects posts and comments, so keep both when you are making a larger change. Blogger’s backup instructions explain the two workflows.
Know which field a value belongs in
- Link List: the name usually controls the visible label; the URL controls the destination. Some theme widgets deliberately interpret that URL as a shortcode or icon value.
- HTML/JavaScript: the title labels the section, while the content field carries the theme shortcode or third-party embed.
- Image gadget: the image, title, caption, and link can each affect a different part of a card or panel.
- Blog Posts: author, label, date, and comment controls belong to the article/listing display rather than a separate homepage gadget.
Add icons without changing the link destination
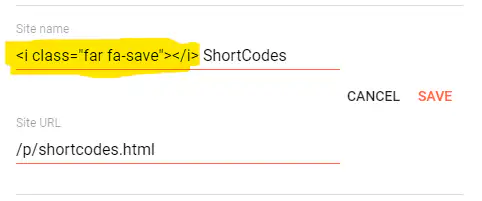
Open the relevant Link List gadget and edit the link text. The icon markup sits before the readable label; the destination stays in the separate URL field. That distinction matters because putting HTML in the URL field makes the menu item unusable.
<i class="far fa-arrow-alt-circle-down"></i> DownloadsUse the Font Awesome family loaded by this theme rather than mixing icon libraries. Keep a short text label beside important icons so visitors can still understand the link if the icon font fails to load. Save and test the same link in the desktop menu and mobile drawer.
Configure the template control panel
The control gadgets in Layout hold values used across the template. Keep their supplied variable names, and change only the value you need. Save a copy of the gadget content before editing several options together.
Choose the comment system
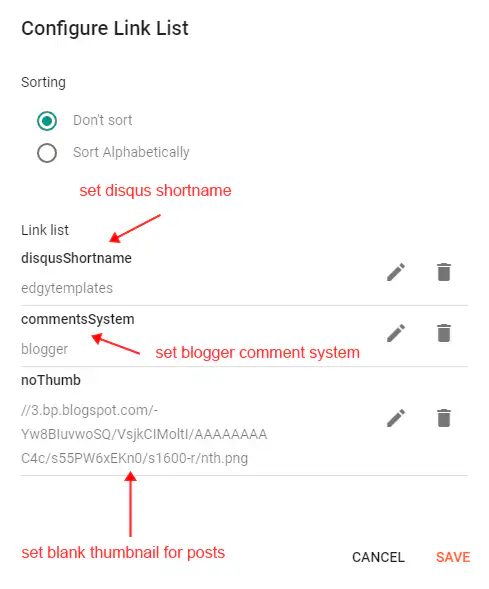
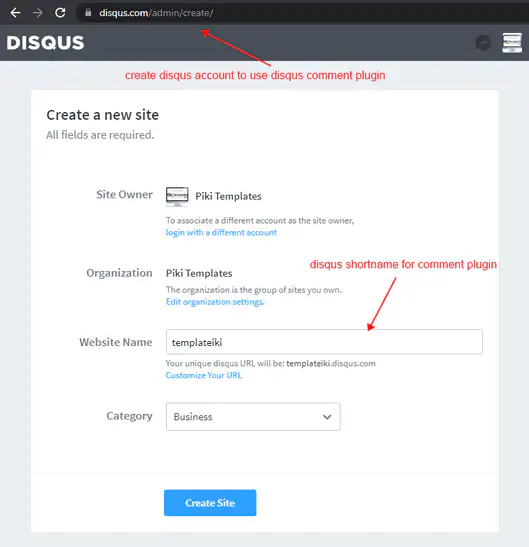
Edit Default Variables. For native Blogger comments, set commentsSystem to blogger. For Disqus, use disqus and the shortname belonging to your own registered Disqus site. A shortname is a site identifier, not the public display name.
commentsSystem = blogger
disqusShortname = Your Disqus Shortname
noThumb = https://example.com/images/fallback-thumbnail.jpg
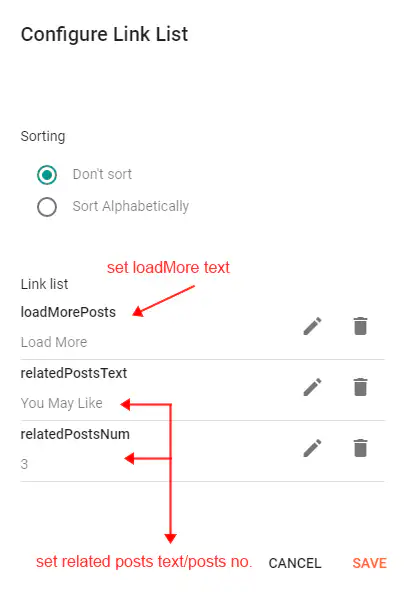
The lines show the variable name and its value. In a Link List, enter them in the separate name and URL/value boxes shown in the screenshot. Replace the sample image address with a direct image URL if you use the fallback-thumbnail option.
Change related-post titles and navigation text
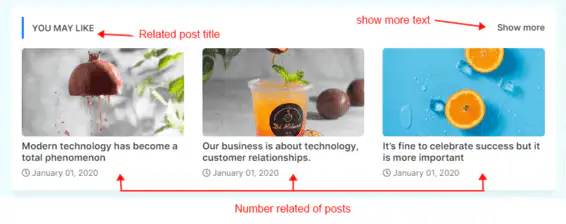
Edit Related Posts / Email text or the matching display-text gadget. The title, requested post count, and Load More wording are separate values. A low related-post count is easier to scan; it also avoids leaving a long recommendation area after a short article.
relatedPostsText = You May Like These Posts
relatedPostsNum = 3
loadMorePosts = Load More
Control sticky navigation and sidebar behavior
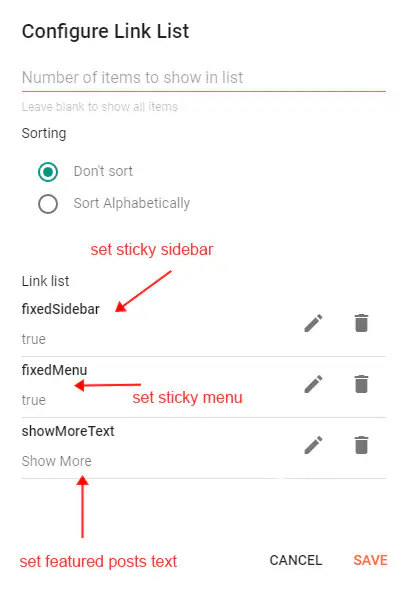
Use the sticky settings in Lazy Scrolls / More Text or Default Variables, depending on the gadget supplied with this theme. A lowercase true enables a boolean option and false disables it. Check a long article after saving: the sidebar or menu should stay usable without covering the footer.
fixedSidebar = true
fixedMenu = true
showMoreText = Show More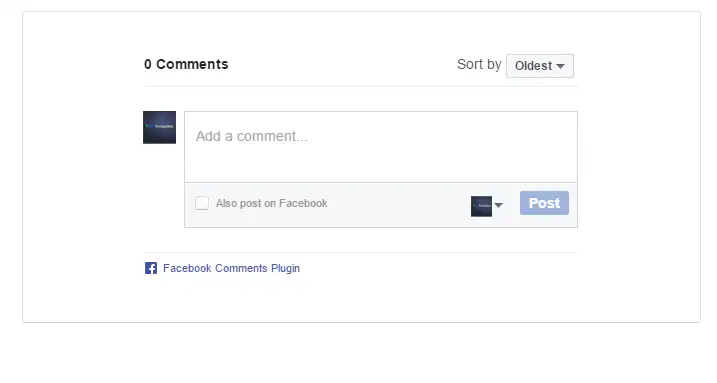

Set the top page links
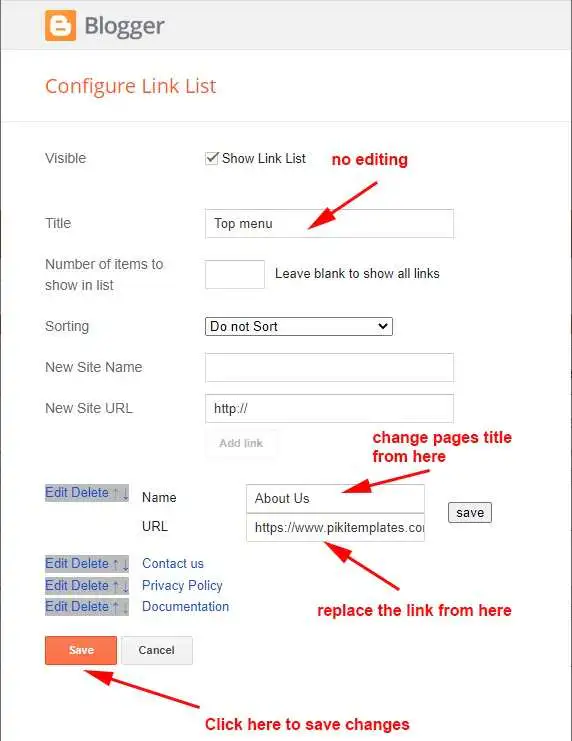
Open Layout > Top Main Menu / Top Pages and edit the existing Link List. Keep the gadget in its intended layout region so the theme can apply the correct spacing and mobile behavior.
- Enter a readable page name and its actual URL. Use this area for a small set of useful destinations rather than duplicating every site link.
- Arrange the entries in the order readers should encounter them. Keep the original ordering pattern when the gadget contains nested items.
- Save and test every destination, including the equivalent mobile navigation. If this is the separate sticky menu, scroll a long page and check it independently of the initial header.
Add the top social links
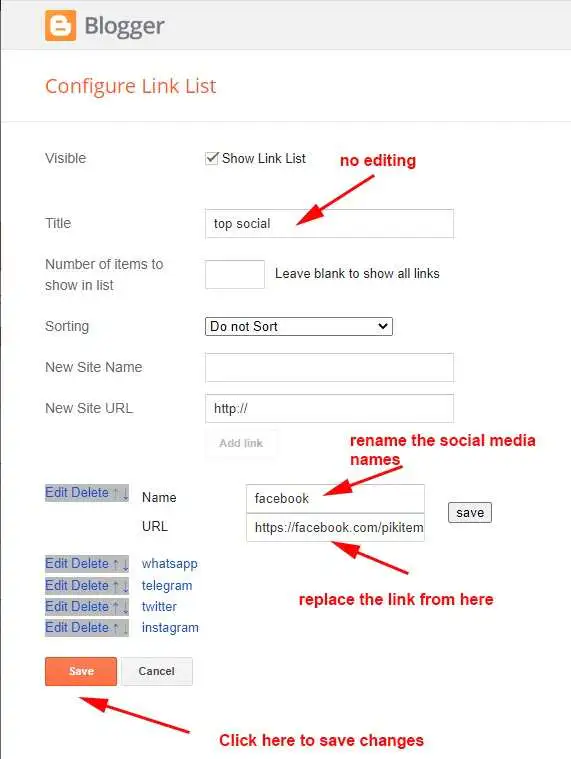
Open Layout > Top Social Media / Top Social and edit the existing Link List. Keep the gadget in its intended layout region so the theme can apply the correct spacing and mobile behavior.
- Set each item’s name to a supported lowercase social identifier.
- Paste the full URL of your own profile in the destination field. Remove demonstration accounts and networks you do not maintain.
- Arrange the items, save the list, and open every icon from the public page. Check both the normal layout and the mobile menu if it reuses these links.
Icon names shown in this reference: facebook, whatsapp, instagram, pinterest, blogger, reddit, youtube, twitter, linkedin, google, apple, microsoft, facebook-f, rss, behance, stack-overflow, telegram, tumblr, dribbble, codepen, snapchat, email, github, stumbleupon, vk. Keep each identifier lowercase, and pair it with your own full profile URL.
Upload your header logo and dark-mode version
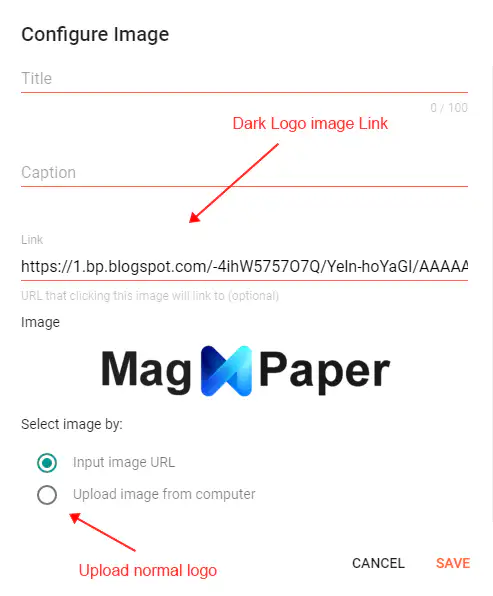
- Open Layout > Main Logo (Header) and edit the existing image gadget.
- Replace the sample image with your logo. Use a clear, compressed image that still looks sharp at the displayed header size.
- Review the title and caption controls before saving. Keep your site name meaningful when the image is unavailable.
- Save, reload the homepage, and check the header at desktop and phone widths. A large source file does not make a small header logo easier to read.
Add the optional dark-logo image
Upload the alternate logo, copy the direct image URL from its image source, and paste that URL into the link/dark-logo field shown by the reference. The value must point to an image, not a post page or a full <img> tag. Save and test contrast in both light and dark mode.
Build the main menu and mega menu
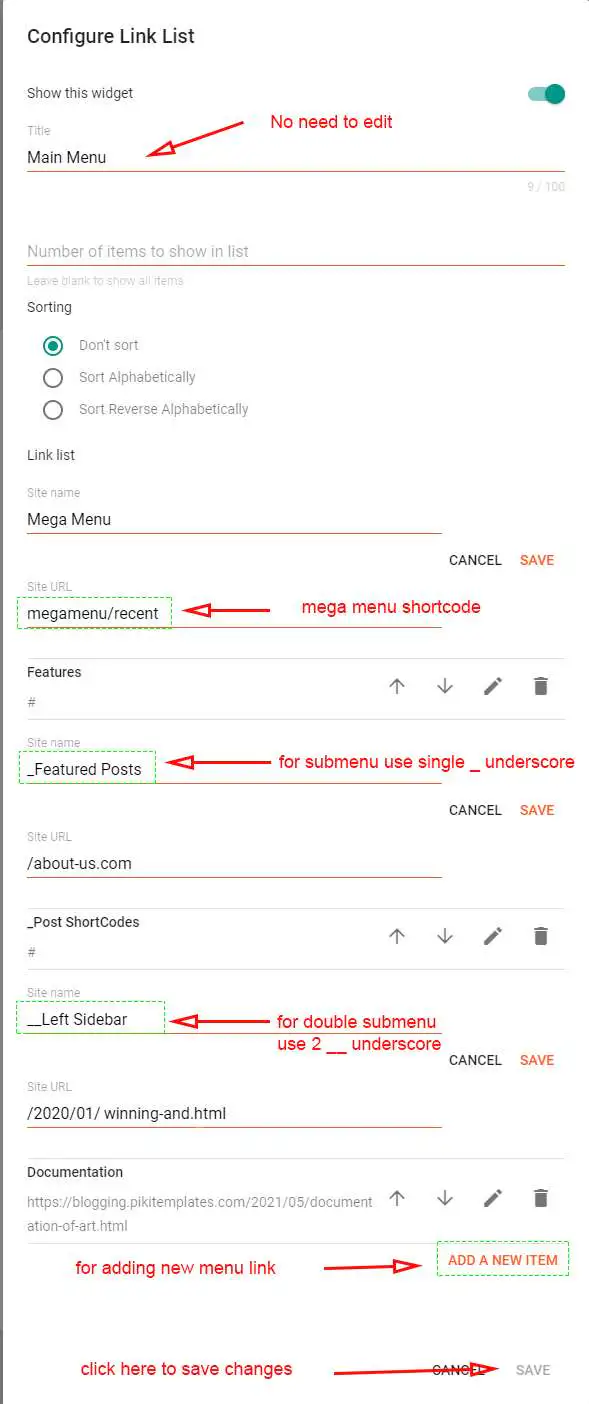
- Edit Layout > Main Menu. Put the readable text in the name field and the page URL or theme shortcode in the URL field.
- Place a parent before its children. Prefix a first-level dropdown with one underscore and a nested child with two. Keep those items together in the Link List order.
- Save the gadget and test the menu with both a mouse and a phone-sized layout. Use short labels that fit without covering adjacent items.
Features
_Getting Started
__Installation
_Contact
Configure a top-level mega menu
For a feed-style dropdown, keep a readable item name and use the documented shortcode as its URL. Select the feed that suits that topic. The label must already be assigned to published posts, with the same capitalization and spaces.
megamenu format
megamenu/recent
megamenu/random
megamenu/Your Label
Choose one example for each gadget. recent selects the newest eligible posts, random asks the theme for a varied selection, and a label name limits the results to that topic. Keep the layout name and any leading result count exactly as documented.
Configure the breaking-post strip
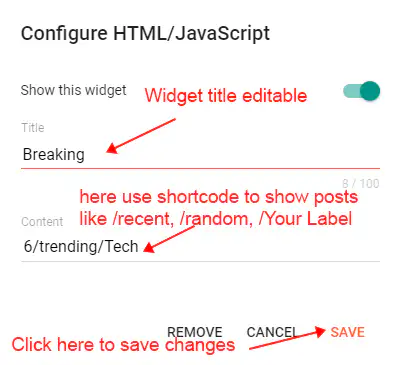
Open Layout > Breaking Posts and edit the gadget already supplied for that area. The title controls the section label; the HTML/JavaScript content selects the theme’s layout and post source. Configure one block first, check it on the public page, then repeat the same process for the remaining sections.
- Choose a shortcode from the formats below and put one complete value in the gadget’s content field.
- Use recent for the latest posts, a documented random variant for a varied set, or replace Your Label with the exact label on your articles.
- Change the result count only when the documented format already includes a leading number. Some layout types have a fixed structure.
- Save and inspect the section with real published posts and images. If there are fewer eligible posts than requested, the displayed block can be shorter than the demonstration.
trending format
6/trending/recent
6/trending/random
6/trending/Your Label
Choose one example for each gadget. recent selects the newest eligible posts, random asks the theme for a varied selection, and a label name limits the results to that topic. Keep the layout name and any leading result count exactly as documented.
Use Popular Posts when that gadget is supplied
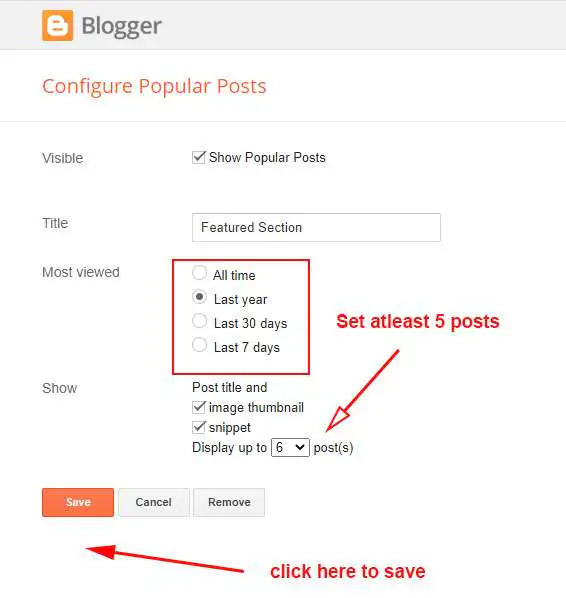
The Popular Posts option selects content by Blogger’s popularity settings rather than a label-feed shortcode. Set its time range, item count, and image options in the gadget itself. Use either the supplied Popular Posts configuration or the matching HTML/JavaScript layout; avoid placing unrelated gadget types in this region.
Configure the featured posts section
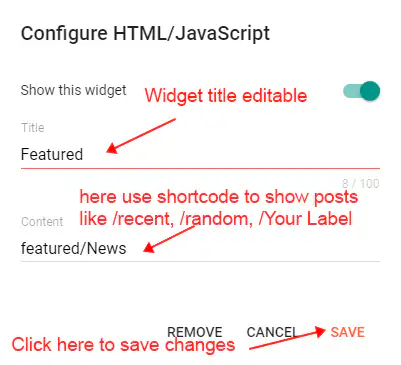
Open Layout > Featured Posts and edit the gadget already supplied for that area. The title controls the section label; the HTML/JavaScript content selects the theme’s layout and post source. Configure one block first, check it on the public page, then repeat the same process for the remaining sections.
- Choose a shortcode from the formats below and put one complete value in the gadget’s content field.
- Use recent for the latest posts, a documented random variant for a varied set, or replace Your Label with the exact label on your articles.
- Change the result count only when the documented format already includes a leading number. Some layout types have a fixed structure.
- Save and inspect the section with real published posts and images. If there are fewer eligible posts than requested, the displayed block can be shorter than the demonstration.
featured format
featured/recent
featured/random
featured/Your Label
Choose one example for each gadget. recent selects the newest eligible posts, random asks the theme for a varied selection, and a label name limits the results to that topic. Keep the layout name and any leading result count exactly as documented.
Use Popular Posts when that gadget is supplied
The Popular Posts option selects content by Blogger’s popularity settings rather than a label-feed shortcode. Set its time range, item count, and image options in the gadget itself. Use either the supplied Popular Posts configuration or the matching HTML/JavaScript layout; avoid placing unrelated gadget types in this region.
For the featured layout shown in this reference, set at least five Popular Posts items so the homepage section has enough content to fill its design.
Configure the featured posts section
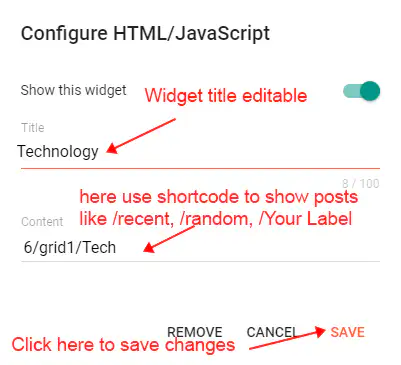
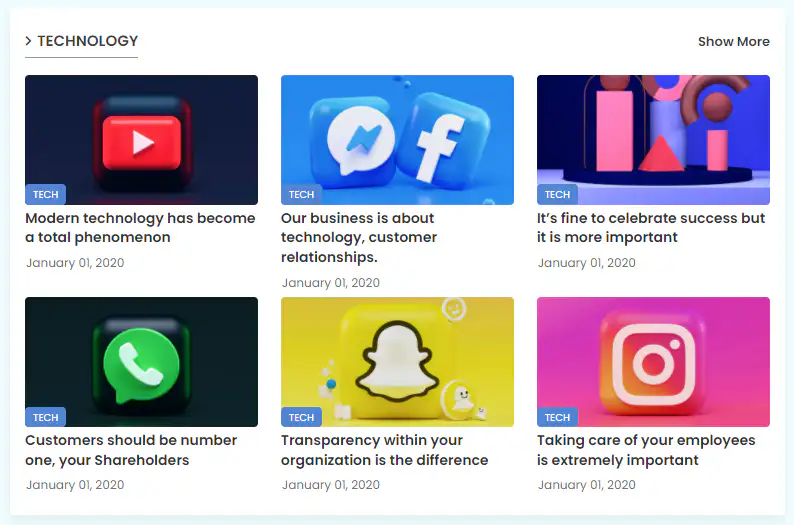
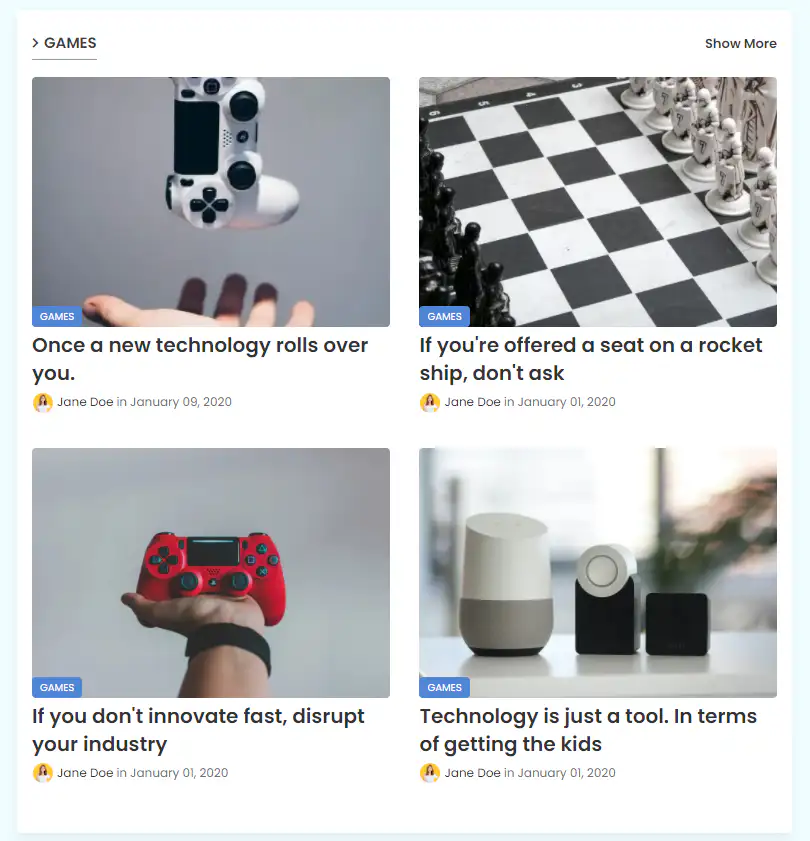
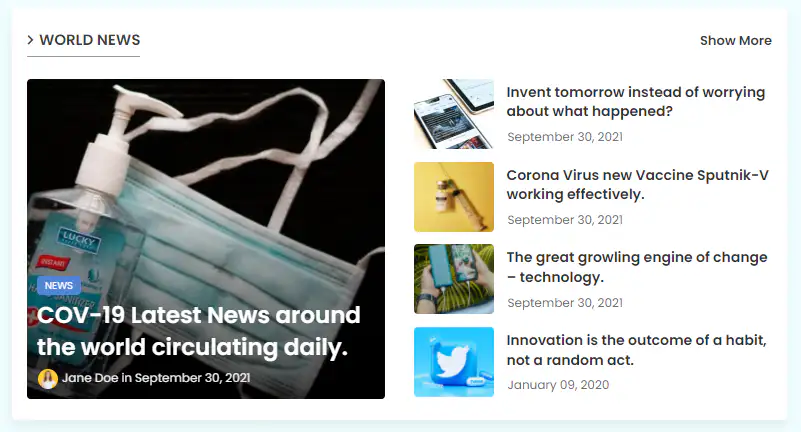
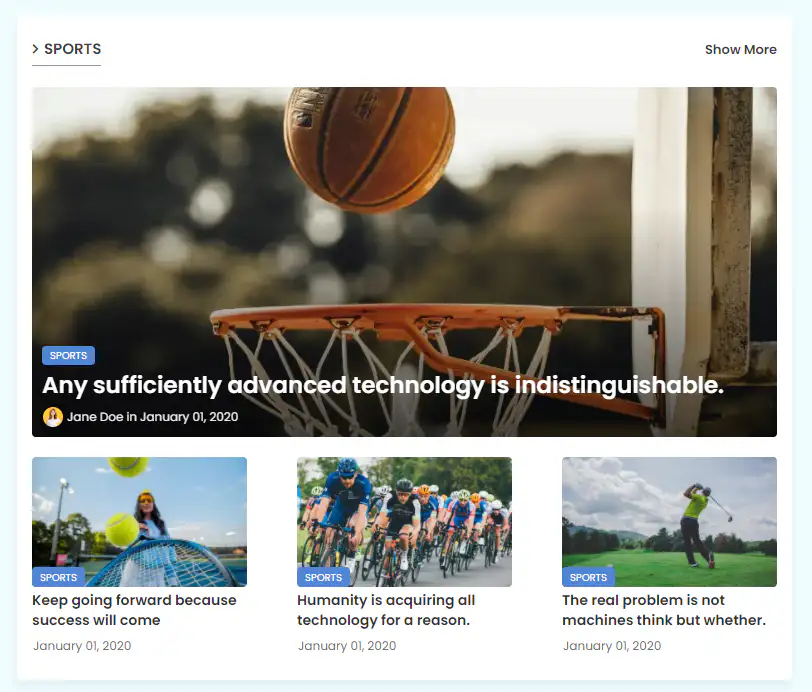
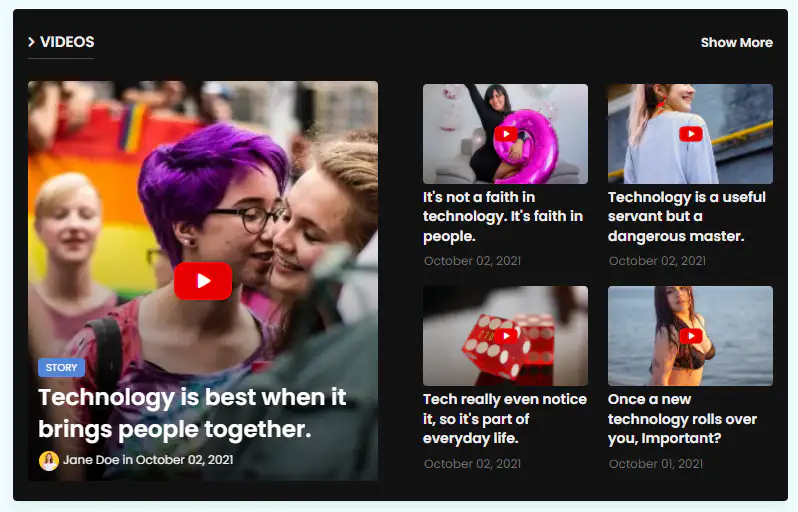
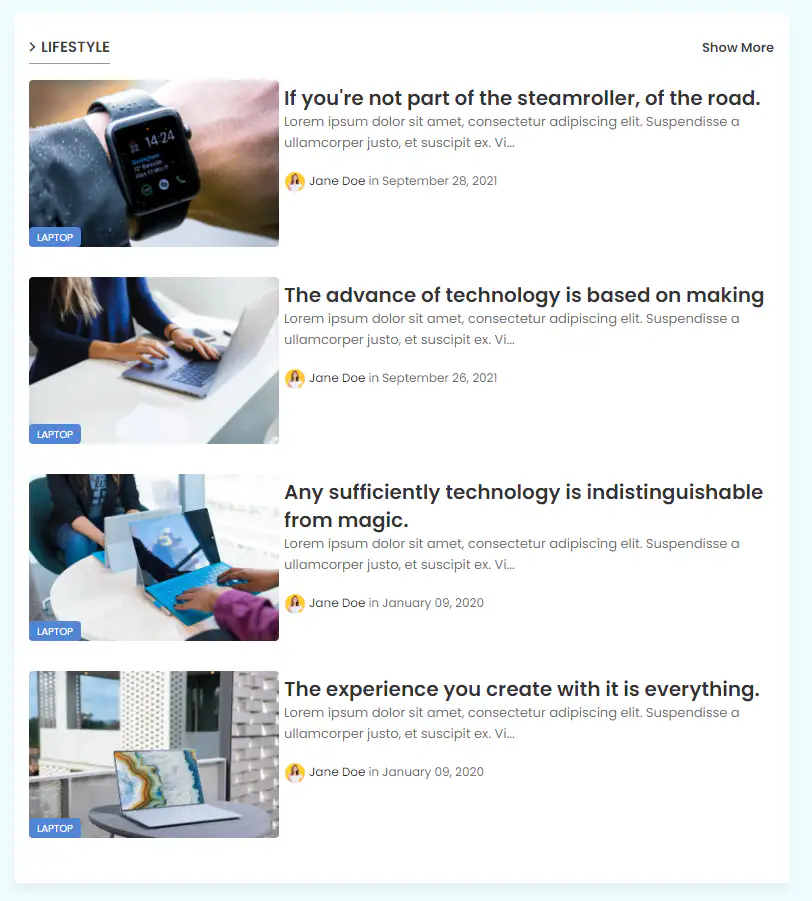
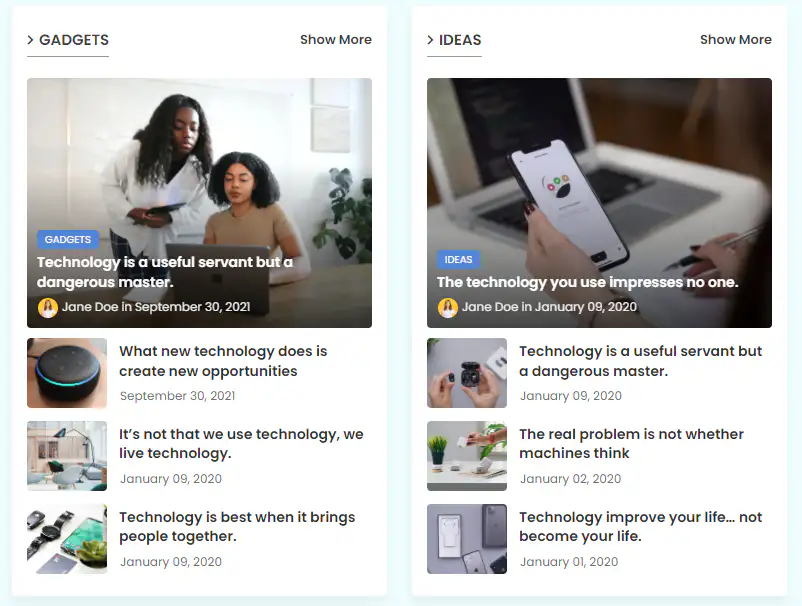
Open Layout > Featured Posts Section and edit the gadget already supplied for that area. The title controls the section label; the HTML/JavaScript content selects the theme’s layout and post source. Configure one block first, check it on the public page, then repeat the same process for the remaining sections.
- Choose a shortcode from the formats below and put one complete value in the gadget’s content field.
- Use recent for the latest posts, a documented random variant for a varied set, or replace Your Label with the exact label on your articles.
- Change the result count only when the documented format already includes a leading number. Some layout types have a fixed structure.
- Save and inspect the section with real published posts and images. If there are fewer eligible posts than requested, the displayed block can be shorter than the demonstration.
grid1 format
6/grid1/recent
6/grid1/random
6/grid1/Your Label
grid2 format
6/grid2/recentblock1 format
block1/recentblock2 format
6/block2/recentvideo format
6/video/recentlist1 format
6/list1/recentcol-left format
6/col-left/recentcol-right format
6/col-right/recentChoose one example for each gadget. recent selects the newest eligible posts, random asks the theme for a varied selection, and a label name limits the results to that topic. Keep the layout name and any leading result count exactly as documented.
Keep the layout format intact
Read a shortcode from left to right: an optional result count, the layout name, and the feed selection. A layout such as block1/recent should not automatically become 6/block1/recent. Different themes use different variants, so copy the exact formats listed for this guide. Use consistent post image proportions to keep mixed grids and columns balanced.
Set the main post list and article details
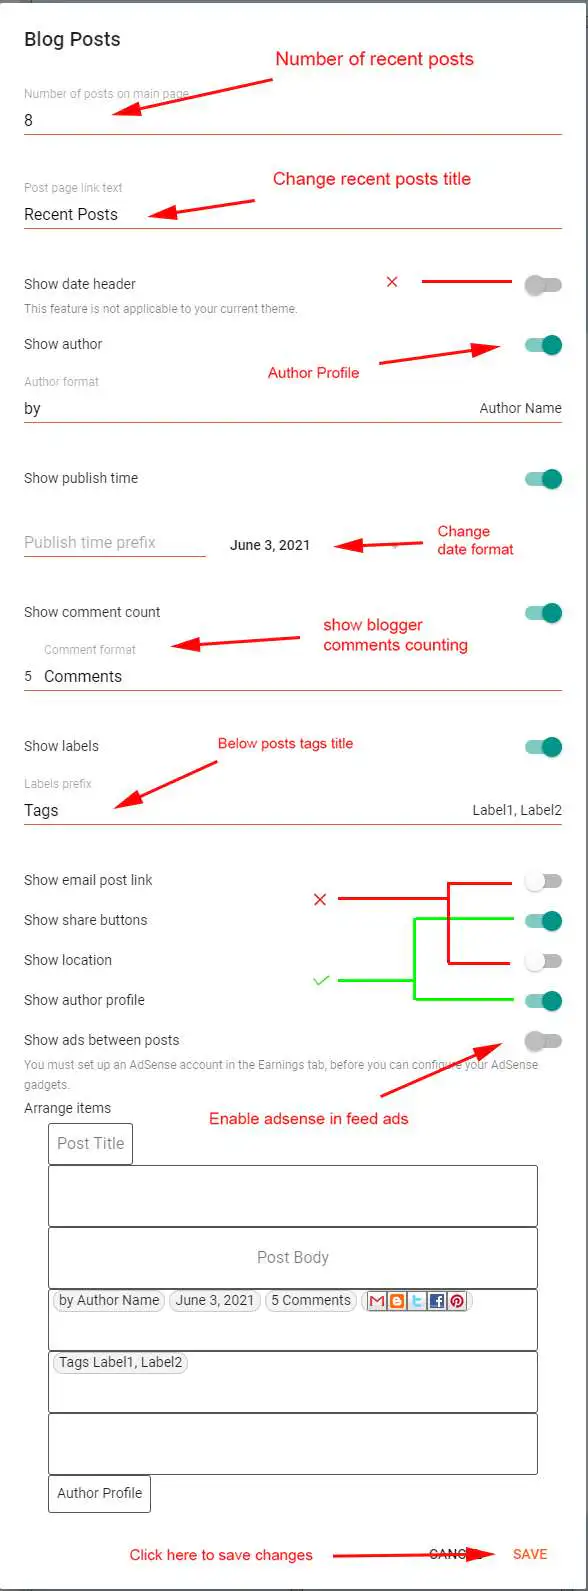
Open Layout > Main Recent Posts / Blog Posts. This gadget controls the main listing and the information shown around an article. Check both views after editing because a change that looks good in the homepage list can affect the full post too.
- Set a sensible number of posts for the main page. Test the next page or Load More action using real published content.
- Review the author, published date, label prefix, and other visible post-information switches supplied by the gadget.
- Keep the author-profile option enabled if you want the biography below articles. Review its actual text later in the Blogger profile.
- If you enable in-feed advertising, use your own provider configuration and confirm how the placement looks between posts.
Connect the post advertising gadgets
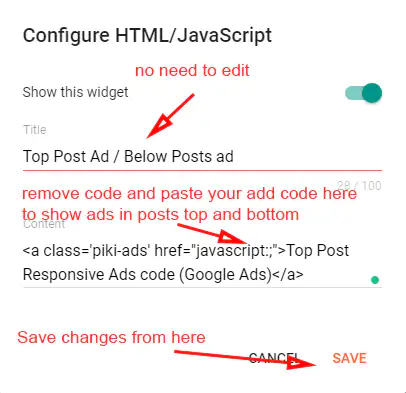
Edit Layout > Top / Bottom Posts Ad. Replace the demonstration code with the snippet from your own advertising provider and keep the gadget in the intended article-ad area.
- Save a copy of the current gadget content before replacing it.
- Paste your real ad code and review any automatic top/bottom display controls.
- Save and open a published article. Check the spacing around the placement and confirm that it does not cover navigation or content.
- If the provider returns no ad, check its account and placement settings before changing the theme shortcode.
Place advertising inside an article
Place a manual ad marker
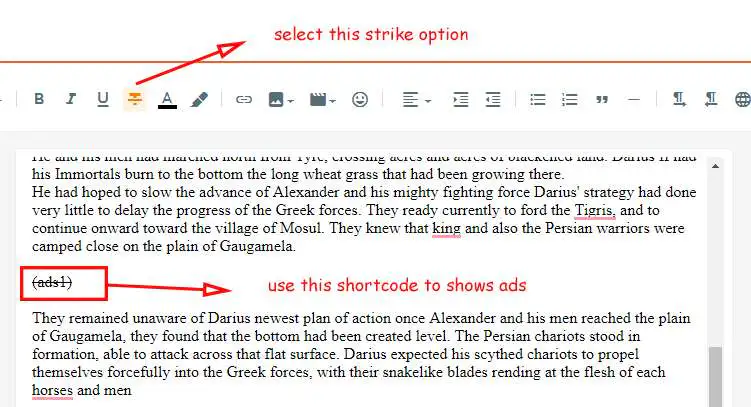
Choose the paragraph break in a Blogger article where the placement should appear, and insert the documented marker below. The marker refers to the configured ad gadget; it is not an ad script by itself.
(ads1)

(ads2)
In this generation, (ads1) uses the top-ad source and (ads2) uses the bottom-ad source. Keeping the real ad code in those gadgets lets you update the shared placement without editing every article.
Set the author biography and social icons
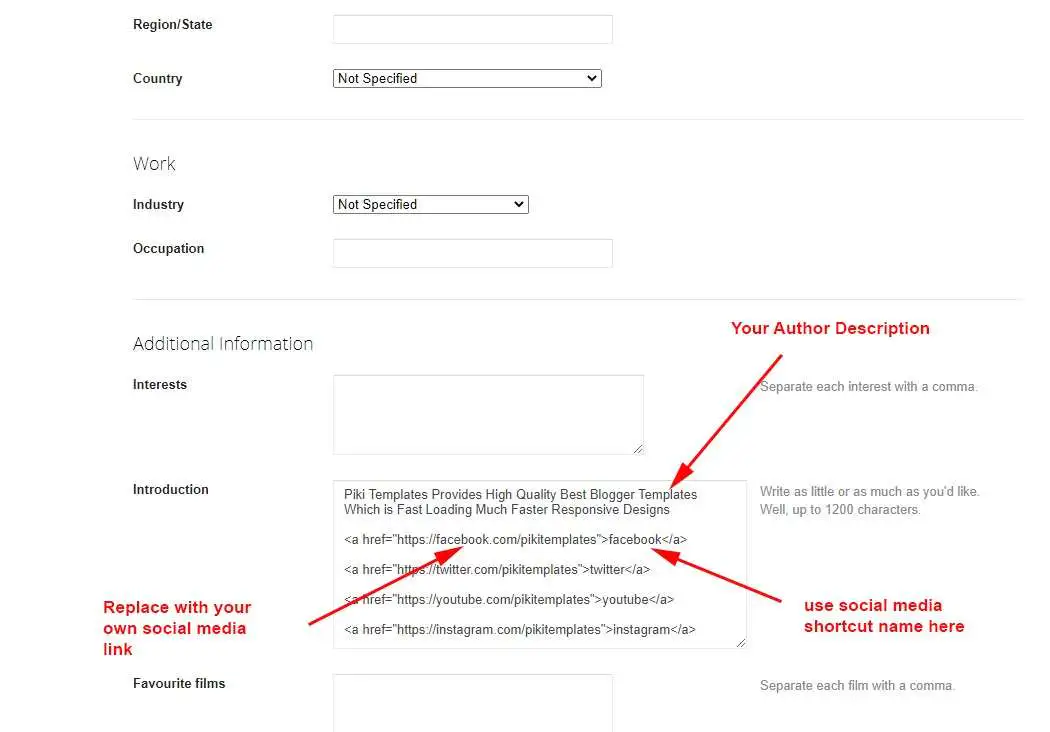
- Open Blogger Settings > Edit Profile and review your display name, photo, and introduction.
- Write a short biography that explains your work or the subject of the blog. Use your own profile rather than the demonstration author in the screenshot.
- Add supported social links to the introduction using the anchor format below. The visible anchor text supplies the icon name; its href supplies the destination.
- Save the profile, then review the Show Author Profile control in Layout > Blog Posts. Open a public article to confirm that the biography and icons appear as intended.
Write a short introduction about yourself.
<a href="https://www.facebook.com/YOUR-PAGE">facebook</a>
<a href="https://www.instagram.com/YOUR-PROFILE/">instagram</a>
<a href="https://www.youtube.com/@YOUR-CHANNEL">youtube</a><a href="https://example.com/">external-link</a>Icon names shown in this reference: facebook, whatsapp, instagram, pinterest, blogger, reddit, youtube, twitter, linkedin, google, apple, microsoft, facebook-f, rss, behance, stack-overflow, telegram, tumblr, dribbble, codepen, snapchat, email, github, stumbleupon, vk. Keep each identifier lowercase, and pair it with your own full profile URL.
Replace every placeholder URL before publishing. Profile icon names and sidebar/footer icon names can differ between theme generations, so use the names supported by the relevant section rather than assuming that every newer social identifier works everywhere.

Review the legacy Facebook integration
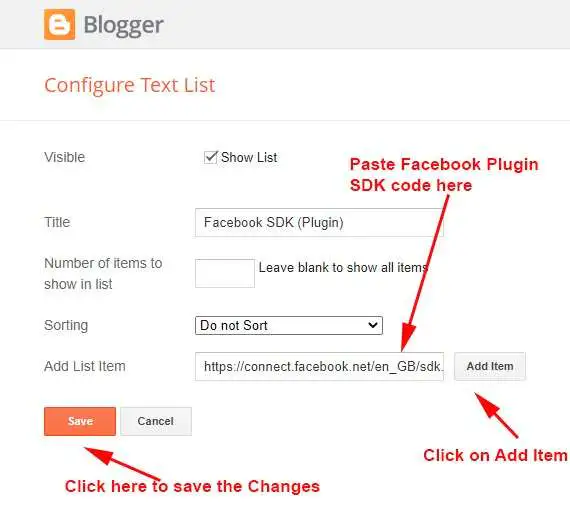
A Facebook Page embed and the comments under an article are separate integrations. If a Page embed is available for your account, create fresh code for your own Page and place it in the supplied HTML/JavaScript gadget. Do not retain the developer’s demonstration Page or copy an old versioned SDK URL into a new installation.
Older admin gadgets select Facebook with commentsSystem = facebook; newer Blog Posts gadgets show the format below. These examples identify the fields in an existing installation and should not be read as a promise that the external service still renders them.
Check Meta’s Page plugin reference before using the optional Page integration. Avoid loading a second SDK if the theme already provides one, and test with your own Page URL.
Review the legacy Facebook integration
This gadget belongs to the same legacy Facebook integration described earlier. Review the existing SDK/control values together rather than treating them as a second independent installation. If the provider no longer supports the widget, leave it disabled and use your supported comment system instead.
Arrange the sidebar and its social links
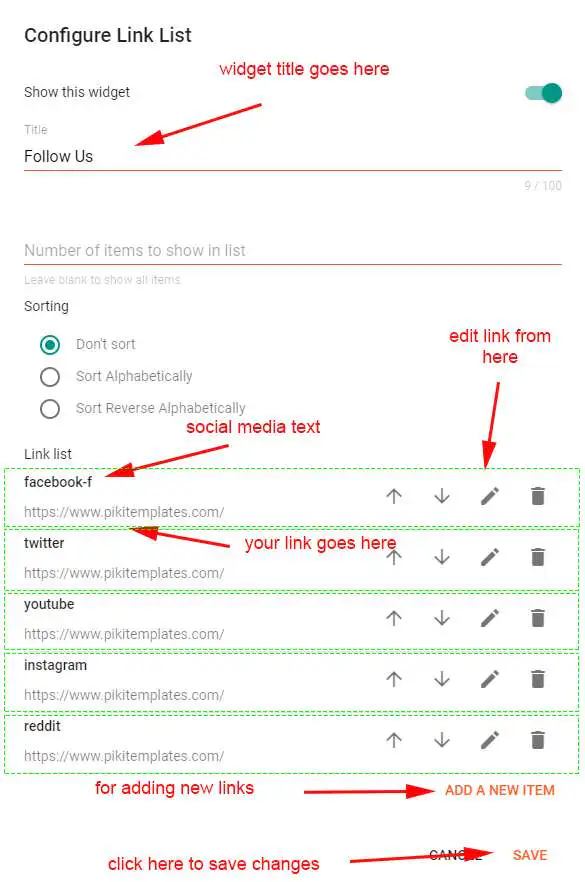
Edit Layout > Social Widget in the sidebar. Set a supported lowercase network name and your own full profile URL for each Link List item, remove unused accounts, and arrange the entries in the order you want visitors to see them.
Icon names shown in this reference: facebook, whatsapp, instagram, pinterest, blogger, reddit, youtube, twitter, linkedin, google, apple, microsoft, facebook-f, rss, behance, stack-overflow, telegram, tumblr, dribbble, codepen, snapchat, email, github, stumbleupon, vk. Keep each identifier lowercase, and pair it with your own full profile URL.
Other sidebar gadgets should earn their space. Use the widgets that your current dashboard and provider support, such as Popular Posts, Link List, Blog Search, or a working contact/signup integration. The PDF may show older gadget names. Configure each provider separately, then check the sidebar beside an article and at the point where it moves below the content on mobile.
Connect your email subscription form
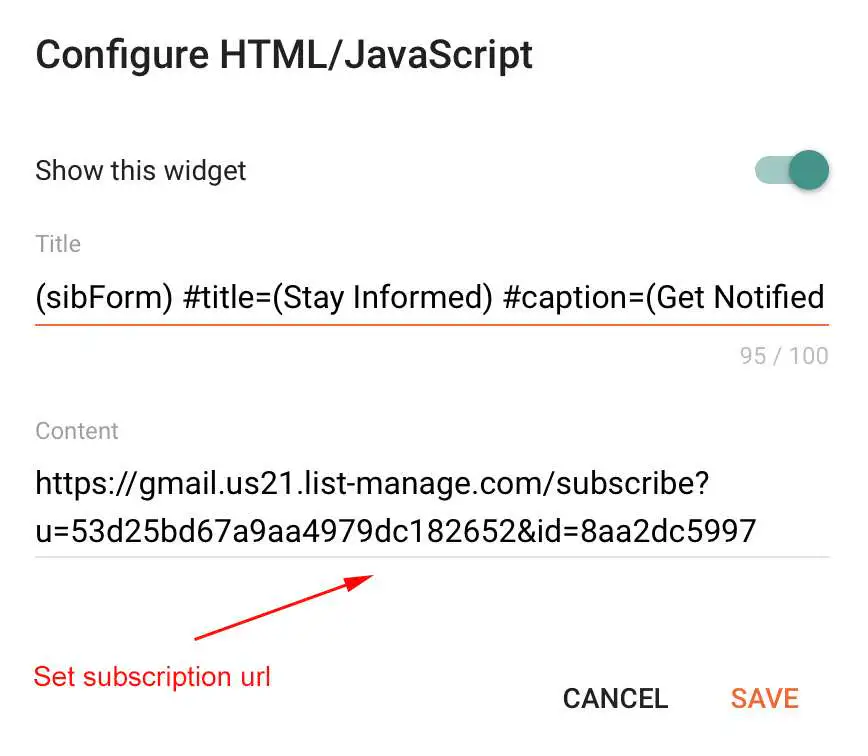
- Create a hosted public signup form with your email provider and copy its subscription URL.
- Open Layout > Follow by Email or the supplied subscription gadget and replace the demonstration form destination with your own.
- Keep the theme’s subscription marker in its content/title field as shown. Add title and caption overrides only when you want to replace the default wording.
- Save and perform a test signup through your own form. Check that it reaches the correct list and that any required confirmation step works.
(sibForm) #title=(Follow by Email) #caption=(Get new posts in your inbox)The theme displays the box; your email service stores subscribers and sends messages. Brevo/Sendinblue and Mailchimp are examples in the reference, not preconfigured accounts that work automatically. A correct-looking form with the demonstration URL still sends readers to the wrong place.
Select the sidebar posts feed
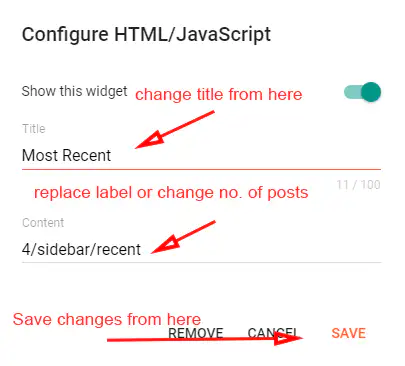
Open Layout > Sidebar Posts / Most Loved and edit the gadget already supplied for that area. The title controls the section label; the HTML/JavaScript content selects the theme’s layout and post source. Configure one block first, check it on the public page, then repeat the same process for the remaining sections.
- Choose a shortcode from the formats below and put one complete value in the gadget’s content field.
- Use recent for the latest posts, a documented random variant for a varied set, or replace Your Label with the exact label on your articles.
- Change the result count only when the documented format already includes a leading number. Some layout types have a fixed structure.
- Save and inspect the section with real published posts and images. If there are fewer eligible posts than requested, the displayed block can be shorter than the demonstration.
sidebar format
4/sidebar/recent
4/sidebar/random
4/sidebar/Your Label
Choose one example for each gadget. recent selects the newest eligible posts, random asks the theme for a varied selection, and a label name limits the results to that topic. Keep the layout name and any leading result count exactly as documented.
Check the sidebar beside a long article as well as on the homepage. Keep the count low enough that the widget remains a useful set of next steps instead of becoming longer than the content it sits beside.
Show recent comments in the sidebar
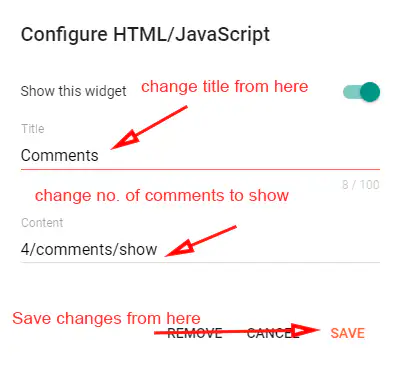
Edit Layout > Comments Section and keep its supplied HTML/JavaScript format. The reference screenshot uses this count/type/visibility structure:
4/comments/showThe first number requests the number of recent comments. Change it to a sensible count, save, and inspect the sidebar on the public blog. This is a recent-comments listing, separate from the comment form under a post. If it is empty, confirm there are published comments and that the blog feed remains enabled.
Add your footer social links
Open Layout > Footer Social Media and edit the existing Link List. Keep the gadget in its intended layout region so the theme can apply the correct spacing and mobile behavior.
- Set each item’s name to a supported lowercase social identifier.
- Paste the full URL of your own profile in the destination field. Remove demonstration accounts and networks you do not maintain.
- Arrange the items, save the list, and open every icon from the public page. Check both the normal layout and the mobile menu if it reuses these links.
Icon names shown in this reference: facebook, whatsapp, instagram, pinterest, blogger, reddit, youtube, twitter, linkedin, google, apple, microsoft, facebook-f, rss, behance, stack-overflow, telegram, tumblr, dribbble, codepen, snapchat, email, github, stumbleupon, vk. Keep each identifier lowercase, and pair it with your own full profile URL.
Build the footer page menu
Open Layout > Footer Menu / Footer Pages and edit the existing Link List. Keep the gadget in its intended layout region so the theme can apply the correct spacing and mobile behavior.
- Enter a readable page name and its actual URL. Use this area for a small set of useful destinations rather than duplicating every site link.
- Arrange the entries in the order readers should encounter them. Keep the original ordering pattern when the gadget contains nested items.
- Save and test every destination, including the equivalent mobile navigation. If this is the separate sticky menu, scroll a long page and check it independently of the initial header.
About, Contact, and the policy pages relevant to your site are useful footer destinations. Create the pages first and link to their published addresses; a placeholder URL can look correct while sending visitors to the wrong place.
Update the footer copyright details
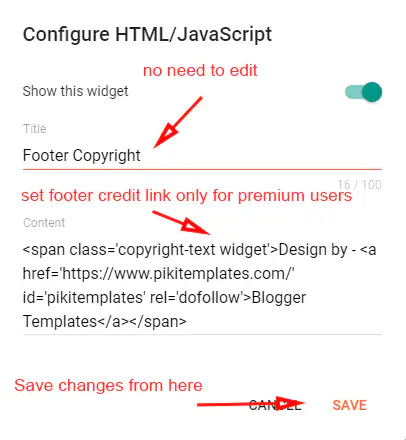
Edit Layout > Footer Copyright and replace the editable sample site details with your own name and URL. Keep the HTML structure intact when the gadget contains a link.
The theme documentation reserves developer-credit removal or replacement for editions that permit it. Keep any required credit for your installed edition. After saving, check the actual footer link text and destination rather than only the text inside the gadget editor.
Configure the cookie notice
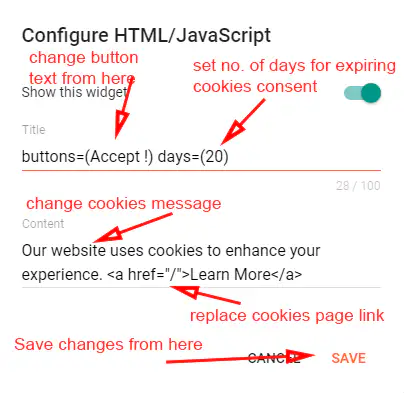
Edit Layout > Cookies Consent. Replace the sample message with clear wording and point its policy link to your own relevant page. Review the existing button text and reminder period in the fields shown by the screenshot.
#buttons=(Accepted!) #days=(20)Where the days setting is present, it controls how long the notice remembers the choice. Test the notice in a fresh browser session and check the policy link. This display setting does not automatically decide how every external analytics, advertising, or embedded-media script responds to a visitor’s choice.
Set the feed mode required by this template
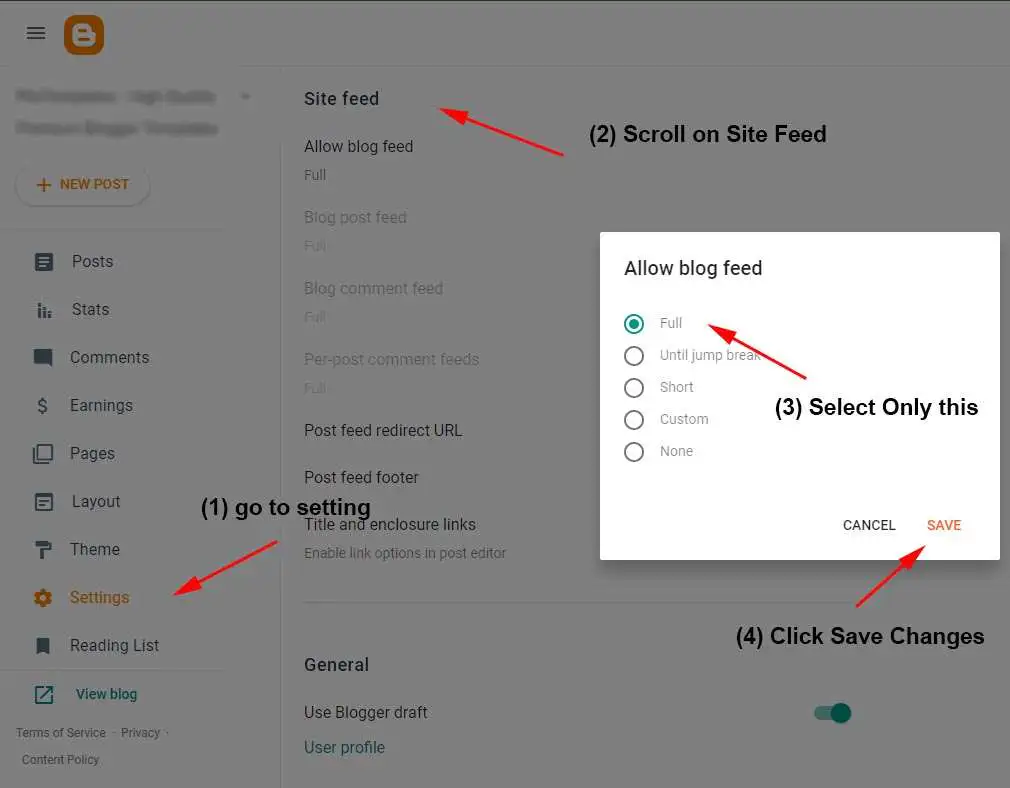
Open Blogger Settings > Site feed > Allow blog feed. This version’s supplied documentation specifies Full. Save that value and check the mega menu, homepage sections, sidebar posts, and recent comments that depend on feeds.
See Blogger’s settings reference for the platform controls. The theme determines how much feed content its own widgets require; the setting is not a universal SEO shortcut.
Advanced checks before you call the setup finished
Keep labels and feed widgets consistent
A section can be configured correctly and still return nothing when its label has no published posts. Check spelling, spaces, and capitalization across the article label, menu destination, and widget shortcode. Test the documented recent-post example first; that separates a label mismatch from a wider feed or gadget problem. Do not copy a shortcode from another template simply because its layout has a similar name.
Preserve the working gadget format
Copy the current gadget content before a larger edit. Change one value, save it, and compare the public result. If a shortcut appears as visible text, first check the target field and any editor formatting shown in the reference. A menu URL, an HTML/JavaScript content field, a profile introduction, and a link’s display text are different inputs even when the examples look alike.
Test the real visitor journey
Start from the mobile homepage, open a menu, follow a category, read a full article, and try the next page or Load More control. Open the footer links and your own subscription or contact destination. A successful visual preview does not prove that an external form delivers messages or that a provider accepted an ad placement, so test those services through your own accounts.
Prepare the content for search and sharing
- Write a descriptive article title and a specific introduction. Use the main phrase naturally and organize the content with useful headings.
- Choose readable post URLs before publishing. Keep established URLs stable unless you can manage the necessary redirects.
- Upload appropriately sized images with clear filenames and meaningful alt text. Describe the image’s purpose instead of filling every alt value with repeated keywords.
- Use relevant internal links, consistent labels, and real About/Contact destinations so readers can understand the site and reach related material.
- Review Blogger’s title, description, search visibility, and HTTPS settings for your actual publishing plan. Check the public article’s title and sharing preview after it is published.
- Save a fresh backup when the complete layout is working. Useful content and a reliable reading experience matter alongside the theme configuration.
Quick fixes for common configuration problems
A section is empty
Confirm the gadget is enabled and in the correct layout area. Use a shortcode documented for this template, check that matching posts are public, and verify the required feed mode. For an image/category panel, check its manually entered destination instead of looking only at post labels.
A dropdown or scrolling link goes to the wrong place
Review the Link List order, underscore prefixes, and parent item. Keep mega-menu shortcodes on top-level links. A scrolling homepage link must match an ID that actually exists in the template; an ordinary page link needs the correct published URL.
An icon, image, or marker looks wrong
Check the expected field and format. Icon HTML in link text differs from an icon identifier used by a service card. An image field needs a direct image URL. Article markers can also depend on the editor formatting shown in the screenshot. Test one known example before changing several values.
The public page still shows the old setting
Save the gadget and any required layout changes, reload the correct blog in a fresh tab, and compare with the value you edited. If a change broke the section, restore your saved gadget content before trying another approach.
Final launch checklist
- Check the homepage and a complete article on desktop and mobile, including light/dark modes where supplied.
- Replace all sample branding, profile accounts, destination URLs, category names, prices, and form links that do not belong to your site.
- Verify every configured homepage widget, the sidebar, and the footer against the content you intended to show.
- Test comments, article navigation, ads, subscription destinations, and contact links using your own setup.
- Keep required credits, save the final gadget values, and make a fresh theme backup.
YOUR PIXY NEWSPAPER 11 SETUP IS READY TO REVIEW
Take one last pass through the blog as a reader. Follow a menu link, open a post, and try the action you want visitors to take next. Keep this guide and your working backup together so that adding another section or updating the theme remains a controlled, understandable change.