
IceFlex Blogger Template: Complete Setup Guide
Set up IceFlex Blogger Template with clear steps for menus, homepage buttons and pinned posts, widgets, comments, ads, colors, and mobile checks.
Before you start
Three small steps will make the setup smoother.
- 01Download and keep your template file nearby.
- 02Back up your current Blogger theme first.
- 03Keep your Blogger dashboard open while you follow this guide.
YOUR ICEFLEX SETUP PLAN
Start with your branding, then build the layout
Use this IceFlex Blogger Template documentation to work through the Blogger layout in a practical order. Configure the essentials first, then add the sections your readers need. Each code example belongs in the Blogger field described beside it.
- 1. Save a backup
Keep a copy of your current theme and gadget settings. - 2. Add your branding
Upload your logo and build clear navigation. - 3. Arrange the homepage
Configure homepage buttons and pinned posts using the sections included in your theme. - 4. Set up the article view
Review comments, related posts, author details, and advertising. - 5. Check the finished blog
Test mobile navigation, links, images, and forms.

This guide explains how to customize IceFlex Blogger Template on Google Blogger, from header navigation and homepage buttons and pinned posts to sidebar gadgets, post settings, and footer links. Work through one section at a time and check the public blog after saving each change.
Layout features covered for IceFlex: an editable homepage introduction and buttons, a pinned article selected with Blogger’s Featured Post gadget. Configure these in the sections supplied by this template rather than adding gadgets from a different theme.
Before you start: back up and prepare your blog
- Select the correct blog in Blogger. Open Theme, use the menu beside Customize, and choose Backup to download the current theme.
- Save the contents of important HTML/JavaScript and Link List gadgets separately. A theme change can affect your gadget arrangement.
- If you are installing the theme for the first time, extract the downloaded package and use its Blogger theme XML file in the Theme restore/upload option. Keep any existing custom code before replacing the theme.
- Publish a few sample posts with images and labels. Feed-based homepage sections need published content to display.
- Open the blog in another tab. After each gadget edit, save it and reload that tab to confirm the result.
For the backup workflow, see Blogger’s theme and content backup instructions. A theme backup and a content backup serve different purposes.
Add your header logo and optional dark logo
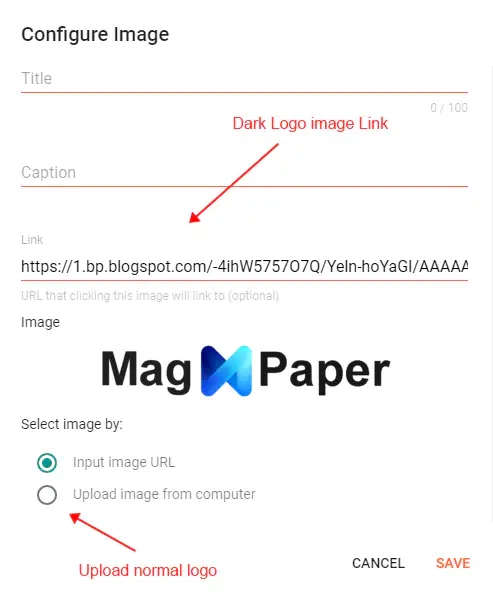
- Open Layout and edit Main Logo (Header).
- Replace the sample image with your own logo. Use a clear, compressed image sized for the header instead of a large photograph.
- Check the title and caption fields before saving. Keep the blog name accurate even when you display an image logo.
- For the optional dark-logo setting, upload the alternate image, copy its direct image URL, and paste it into the gadget’s link field shown in the reference. Test the logo on both light and dark backgrounds.
- Save the gadget and check the header at desktop and phone widths.
Build your navigation menu
Add main links and dropdowns
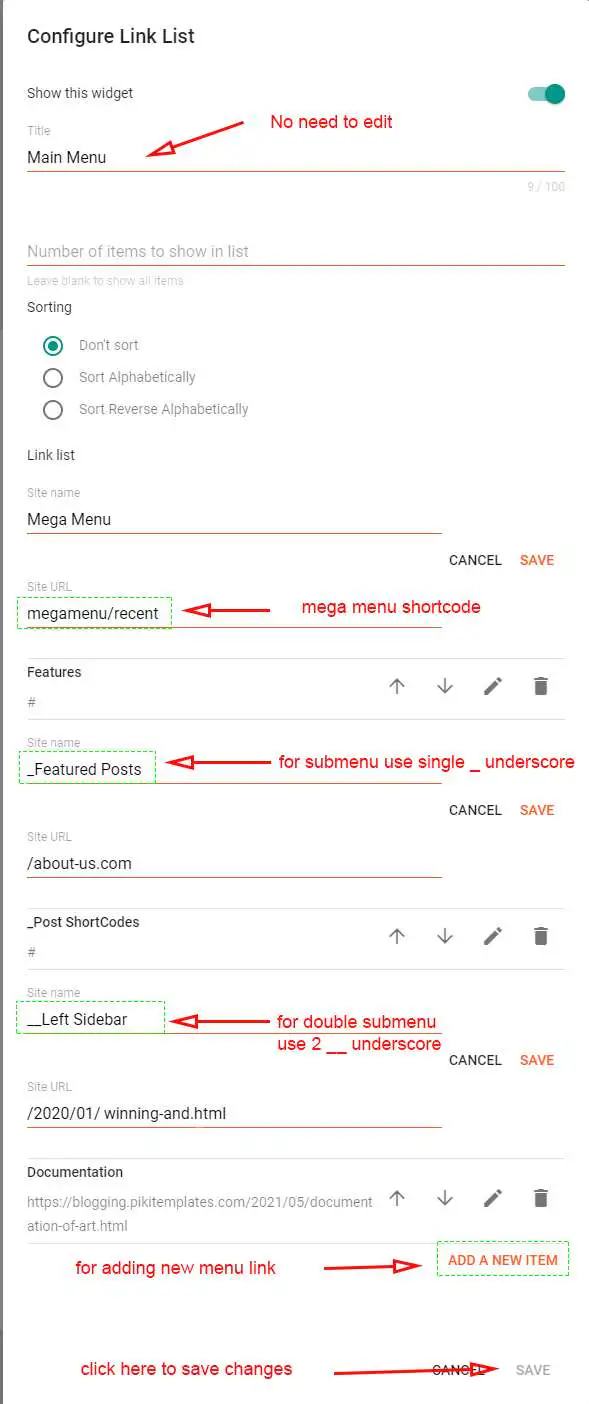
- In Layout, edit Main Menu. Add the visible link text and its destination URL.
- Place each parent link before its children. Prefix a first-level dropdown title with one underscore; use two underscores for a child inside that dropdown.
- Arrange the entries in the intended menu order, save the list, and test every destination.
- Open the mobile menu and make sure long labels and nested links remain easy to tap.
Features
_Getting Started
__Installation
_Contact
The underscores control the menu hierarchy; they are not part of the destination URL. Keep related links together under the correct parent.
Add icons to menu links
The supplied reference uses Font Awesome markup inside the link text. Add the icon before a readable label, while keeping the URL field separate.
<i class="far fa-arrow-alt-circle-down"></i> DownloadsCreate a mega menu
Edit a top-level menu item and put one of these theme shortcodes in its URL field. Choose recent posts, random posts, or posts carrying a particular label.
megamenu/recent
megamenu/random
megamenu/Your Label

Configure the admin control gadgets
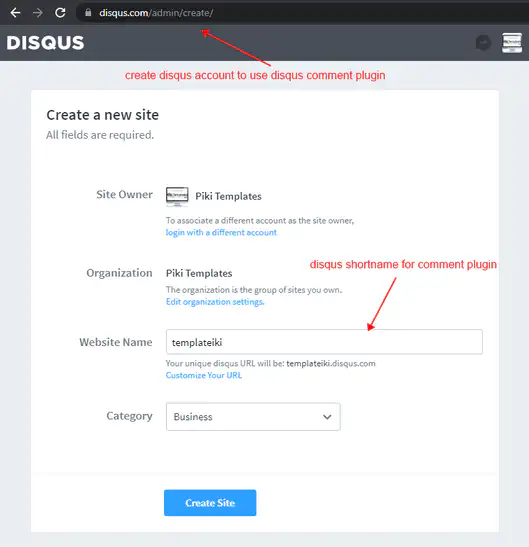
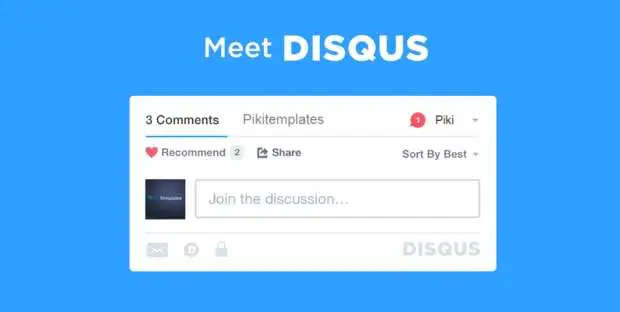
Choose your comment system
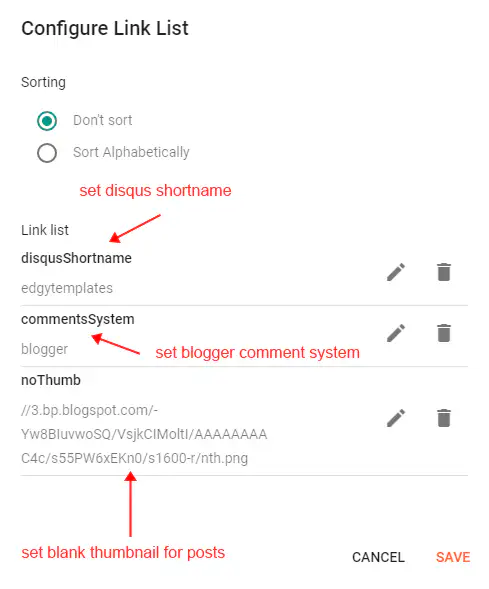
Open Layout > Default Variables. This template generation stores its comment choice and fallback thumbnail here. Add or edit each Link List variable using the name and value fields; the lines below show the name-to-value pairs.
commentsSystem = blogger
disqusShortname = Your Disqus Shortname
noThumb = https://example.com/images/fallback-thumbnail.jpg
Use blogger for native comments or disqus with the shortname from your own Disqus site. The fallback thumbnail needs a direct image URL. Do not enter the sample website address as your real image.
Set related posts and button text
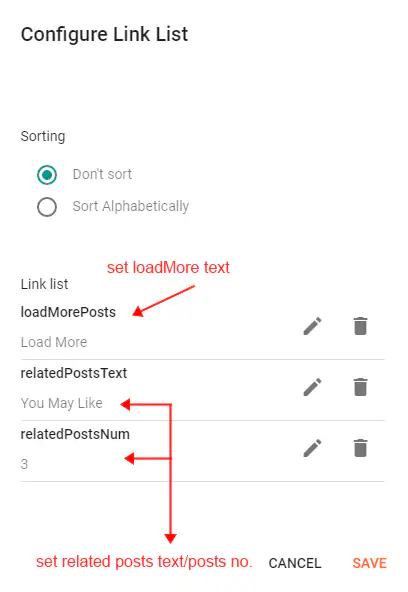
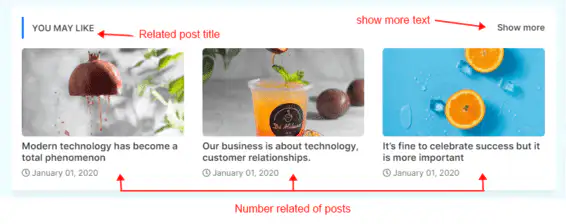
Edit Related Posts / Email text or its equivalent Link List. Change the displayed title and number of related posts, then update the Load More wording.
relatedPostsText = You May Like These Posts
relatedPostsNum = 3
loadMorePosts = Load More
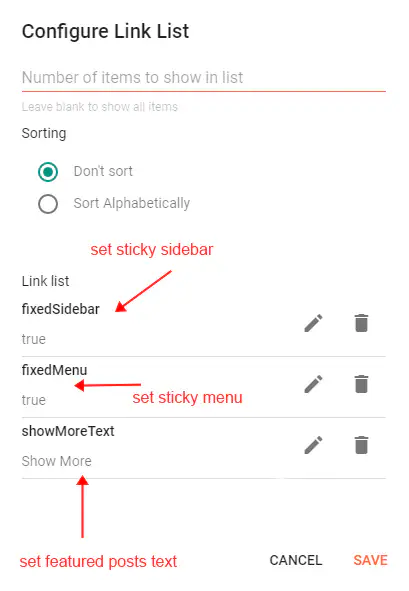
Control sticky elements and Show More text
In Lazy Scrolls / More Text, use the existing variable names below. Set each sticky option to lowercase true or false; do not rename the keys.
fixedSidebar = true
fixedMenu = true
showMoreText = Show More

Customize the homepage introduction and buttons
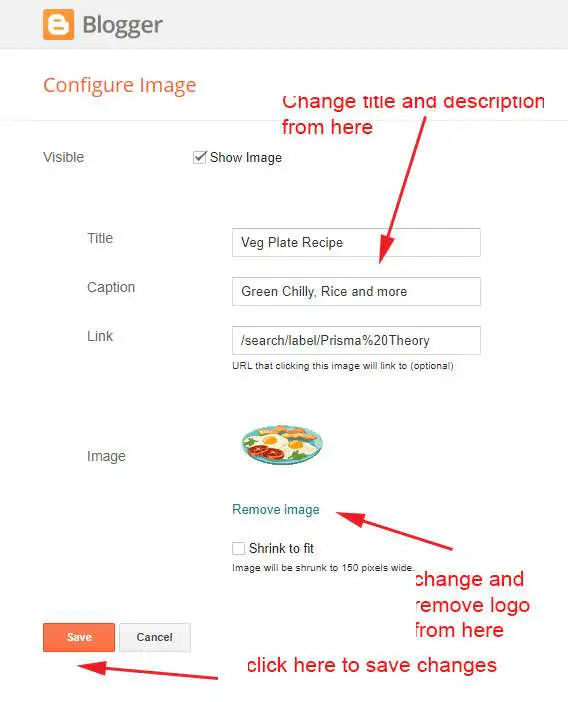
- Open Layout > Homepage buttons and edit the existing gadget.
- Replace the demonstration title and caption with a short introduction to your blog. Keep the main message clear on a phone screen.
- Update any existing button destinations to your own pages and retain the gadget’s supplied format.
- Save the gadget, open the homepage, and check that each visible button leads to the intended page.
Choose a pinned homepage post
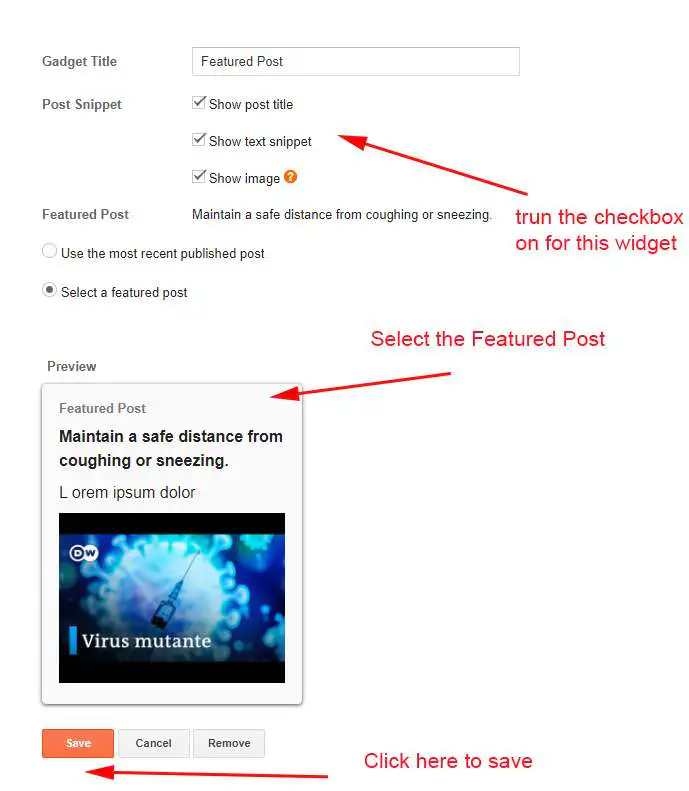
Open Layout > Pinned Posts Section and edit the Blogger Featured Post gadget. Select the article you want visitors to see first, review its title and image options, and save. Use a useful introduction, evergreen guide, or important announcement. Check the homepage after publishing the selected post.
Set the main post list and article details
Open Layout > Main Recent Posts / Blog Posts. Choose how many posts appear on the main page and review the visible post details. Save the gadget and inspect both a homepage listing and a complete article.
- Review the author-profile and post-information options in the Blog Posts gadget.
- Adjust the display count and navigation to keep the main list manageable.
- If you enable in-feed advertising, use your own account configuration and verify the ad placement on the public blog.
- Check that related posts and the Load More label reflect the admin variables configured earlier.

Add advertising to posts and pages
Open Layout and edit the Top / Bottom Posts Ad gadgets. Replace sample markup with the ad code from your own advertising provider. These gadgets supply the content used by the markers inside posts.
Place an ad between paragraphs
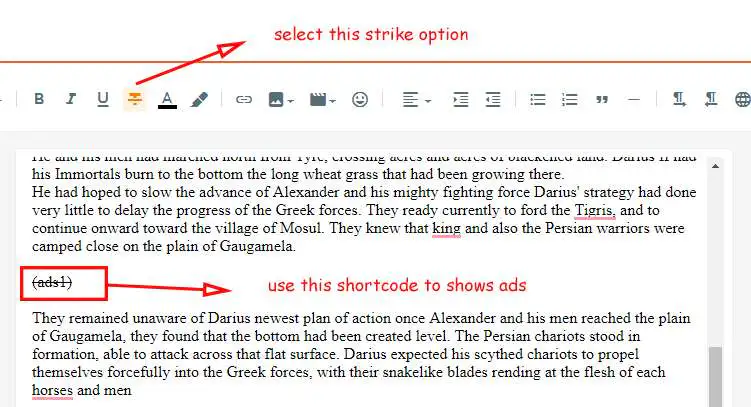
Edit a Blogger post, choose the desired paragraph break, and insert the marker for the appropriate configured gadget. The marker itself does not contain an advertisement.
(ads1)

(ads2)
Use (ads1) for the top-ad source and (ads2) for the bottom-ad source. Save, preview the article, and check the spacing on mobile.

Set your author biography and social links
- Open Blogger Settings > Edit Profile and review your display name, photo, and introduction.
- Write a short biography describing your experience or the subject of the blog.
- Where the theme reads social links from the introduction, add your profile links using the format below.
- Return to Layout > Blog Posts and enable Show Author Profile if you want the biography box visible.
Write a short introduction about yourself.
<a href="https://www.facebook.com/YOUR-PAGE">facebook</a>
<a href="https://www.instagram.com/YOUR-PROFILE/">instagram</a>
<a href="https://www.youtube.com/@YOUR-CHANNEL">youtube</a>
<a href="https://example.com/">external-link</a>
Replace every sample URL and account name with your own information. The visible anchor text supplies the icon identifier, so use a supported lowercase name. Save the profile and inspect the biography on a public article.


Review the legacy Facebook integration options
A Facebook Page embed and an article comment system are separate features. If a Page widget is currently available for your account, generate fresh embed code for your own Page and use an HTML/JavaScript gadget. Avoid copying the old SDK URL or demonstration Page from a screenshot.
Review Meta’s Page plugin documentation before using this optional integration. If your theme loads the SDK automatically, avoid adding another copy.

Add sidebar social links
Edit Layout > Social Widget or the supplied social Link List. Add each network as an item with its supported lowercase identifier and your full profile URL. Keep only the accounts you actively maintain, arrange their order, and test the icons after saving.
Common identifiers shown in the references include facebook, instagram, youtube, pinterest, linkedin, telegram, github, rss, and whatsapp. Use only identifiers supported by your installed theme; older and newer versions can differ.

Connect the email subscription box
- Create a hosted signup form with your email service and copy its public subscription URL.
- Open Layout > Follow by Email and replace the demonstration subscription URL with your own.
- Keep the theme’s subscription marker in its text/content field. Add title and caption settings only when you want to override the defaults.
- Save and perform a real test signup using your own form. Confirm that the subscriber reaches the right list and receives any confirmation required by your service.
(sibForm) #title=(Follow by Email) #caption=(Get new posts in your inbox)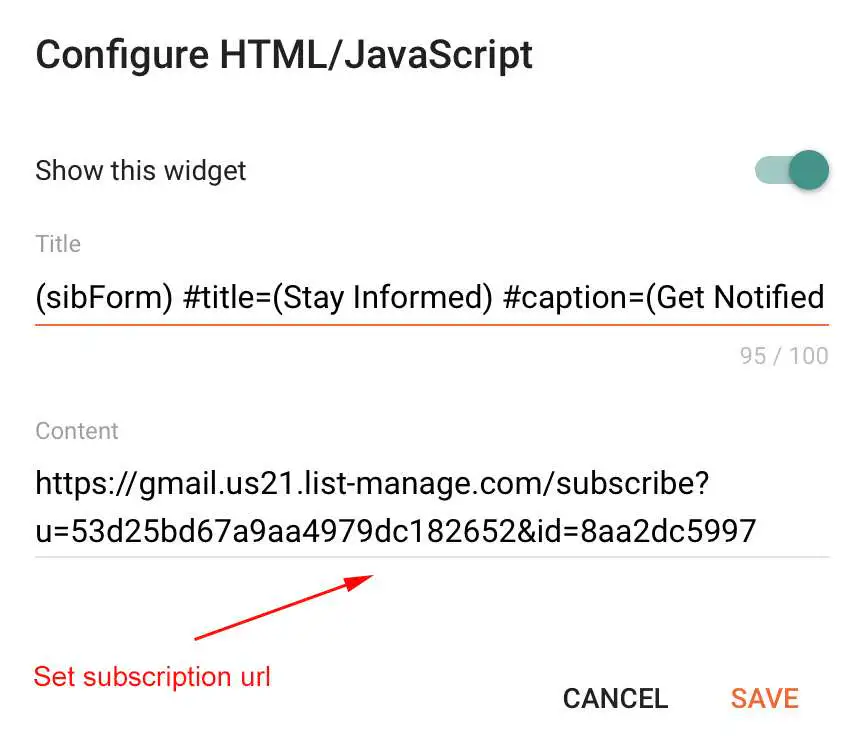
Choose the sidebar posts feed
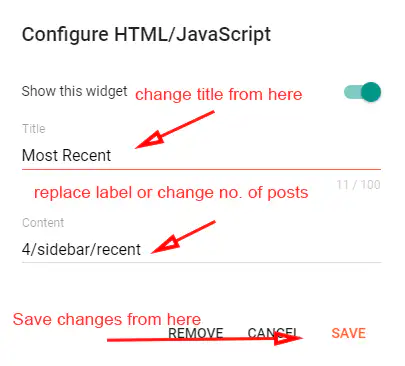
Edit Sidebar Posts or the supplied Most Loved / Most Recent gadget in Layout. Set its visible title and enter one feed shortcode in its content field.
4/sidebar/recent
4/sidebar/random
4/sidebar/Your Label
The first number requests the post count. Use recent, random, or an exact label to select the articles. Save and check that the sidebar remains useful beside both short and long posts.
Display recent comments in the sidebar
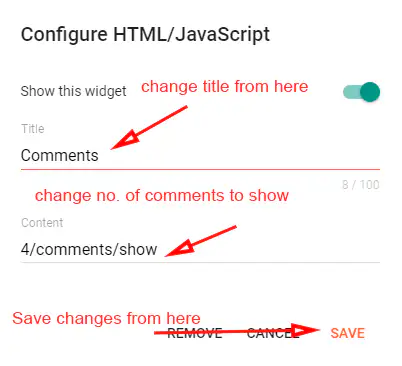
Open Layout > Comments Section and edit its HTML/JavaScript gadget. The supplied screenshot uses the following format; adjust the number if you want a different count.
4/comments/showSave and check a page containing the sidebar. If nothing appears, confirm that there are published comments and that the blog feed is enabled. This widget is separate from the comment system shown underneath an article.
Set your footer social links
Edit the social Link List in the Footer Section. Replace the sample accounts with your own profile URLs and use the supported lowercase network identifiers as names. Remove unused entries, save, and verify that the footer icons have working destinations.
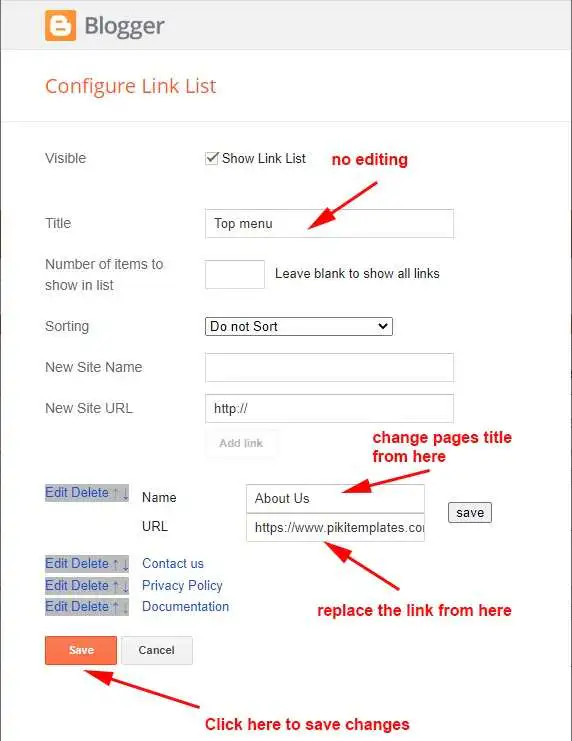
Build the footer page menu
Open Layout > Footer Menu / Footer Pages. Add useful pages such as About, Contact, and the policy pages relevant to your blog. Use each page’s actual URL, arrange the list, and save. Test the links from a phone as well as a desktop browser.
Update the footer copyright
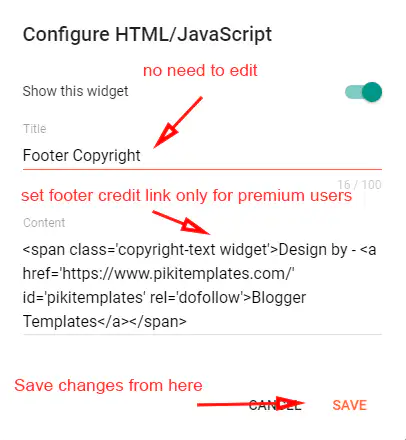
Edit Layout > Footer Copyright and replace editable sample site details with your blog’s name and link. Keep any required developer credit in place for the edition you use. The supplied reference reserves credit removal or replacement for editions that permit it.
Configure the cookie notice
Edit Layout > Cookies Consent. Write a clear notice, set the link to your own relevant policy page, and adjust the button label and reminder period using the documented settings.
#buttons=(Accepted!) #days=(20)The days value controls how long the notice remembers the choice. Check the notice in a fresh browser session. This display option does not by itself configure how all third-party scripts respond to a visitor’s choice.

Set the feed mode required by this template
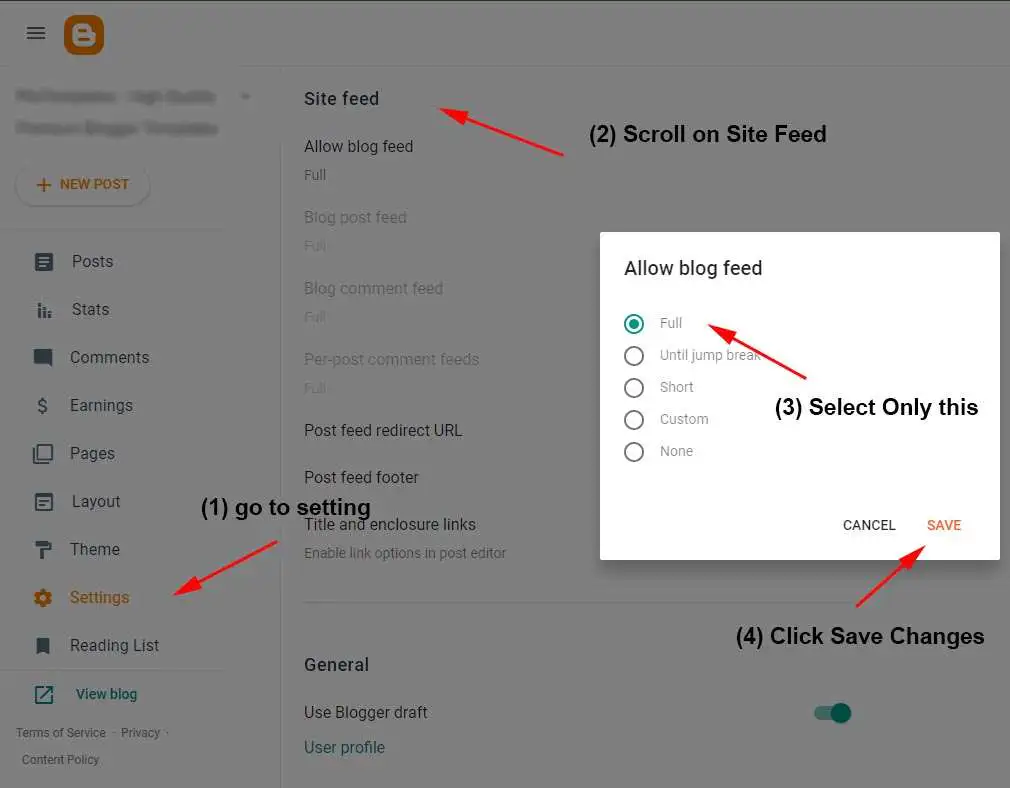
Open Blogger Settings > Site feed > Allow blog feed. The supplied IceFlex reference specifies Full for this template generation. Save that setting, then retest the mega menu, homepage feeds, sidebar posts, and recent comments.
See Blogger’s settings reference for the platform’s feed controls. The appropriate Full or Short choice depends on the theme’s feed implementation.
Make the finished blog easier to find and use
- Write a clear blog title and a concise description of its topic. Confirm that Blogger’s search-engine visibility setting matches your publishing intent.
- Give each article a descriptive title and a useful introduction. Use headings to organize long content rather than repeating keywords.
- Choose readable, relevant post URLs and link related articles where those links help readers.
- Use descriptive image filenames before uploading, and add alt text that explains the image’s purpose. Compress large images while keeping screenshots readable.
- Use consistent post labels so navigation and label-fed sections lead to relevant content. Remove empty demonstration categories.
- Verify page titles, social previews, and the mobile reading experience on the actual blog. A theme configuration alone does not guarantee search rankings.
Quick fixes for common setup problems
A homepage or sidebar section is empty
Confirm that the gadget is enabled, the shortcode uses a layout supported by this template, and the feed mode matches the guide. Check for published posts with the exact label used in the shortcode. Switch temporarily to the documented recent-post example to separate a label issue from a gadget issue.
A shortcode appears as plain text
Check its location first. Feed shortcodes belong in the designated HTML/JavaScript gadget, menu shortcodes belong in the menu URL field, and article markers belong in a Blogger post. Remove accidental formatting or added spaces inside the shortcode and test it again.
A dropdown or mega menu does not work
Review the Link List order, underscore prefixes, and parent links. Put the mega-menu shortcode on a top-level item. Save the gadget, reload the blog, and test both mouse and touch navigation.
An icon, ad, or subscription box is missing
Check the relevant dependency: the icon format must match the theme library, ad markers need a configured ad gadget, and the subscription box needs your working form URL. Third-party display can also depend on the provider and browser settings.
Changes do not appear on the public blog
Save both the gadget and any layout changes required by Blogger. Reload the public page in a fresh tab and confirm that you edited the correct blog. If a change broke the page, restore the previous gadget content or theme backup before continuing.
Final launch checklist
- Your logo and navigation show correctly at desktop and mobile widths.
- All demonstration URLs, social accounts, and subscription links have been replaced.
- Every configured homepage section has the expected published posts or category destination.
- A full article shows the intended author details, related posts, comments, and ad placements.
- The footer links work, required credits remain, and the cookie notice points to the right page.
- The feed is enabled, pagination works, and a fresh backup is saved after the completed setup.
YOUR ICEFLEX SETUP IS READY TO REVIEW
Open your homepage and one complete article on a phone and a desktop browser. Follow the navigation, try the subscription form, and confirm that each section helps readers reach the right content. Keep this guide available when you add another gadget or update the theme.